
Punching a hole in leather seems simple, until the edge distorts, the hole becomes oval, or the leather tears under pressure. Leather perforation requires a precise action, a suitable tool, and an understanding of the material. Each project (sewing, rivet installation, belt adjustment) calls for a different diameter and technique.
Punching thick leather without distorting the material
You may have noticed that a hole punched in soft leather remains clean, while the same action on saddle leather produces a crushed edge? Thickness changes everything. Leather thicker than two millimeters resists penetration more, and the pressure required increases the risk of distortion.
Related reading : How to Sell Your Property Quickly: Tips for an Efficient Transaction
A rigid metal block placed under the piece prevents the leather from bending at the moment of impact. Without this support, the force dissipates in the material instead of cutting cleanly. Hard wood works too, but it wears out quickly and ends up creating irregularities.
The angle of penetration is as important as the force. An angled punch, even slightly, produces an oval hole instead of a circle. To maintain verticality, a bench press offers a clear advantage over freehand work.
Further reading : How to Effectively Install Your Induction Cooktop: Tips and Methods
Deco Cuir offers, for example, a press that accepts punch dies of various diameters, allowing for consistent alignment when punching thick leather. Several artisans discussing leather perforation methods on Zazie Web confirm that the repeatability of the action makes the difference between a clean hole and a torn one.
Before punching thick leather, lightly dampen the area with a sponge. Wet leather cuts more easily and regains its rigidity as it dries. Be careful, this technique is not suitable for leather that has already been dyed or waxed, as water can leave marks.
Choosing the right punching tool according to use
A sewing hole and a hole for a grommet require neither the same diameter nor the same tool. Confusing the two results in a fragile or unsightly outcome.
Punch, hole cutter, or rotary pliers
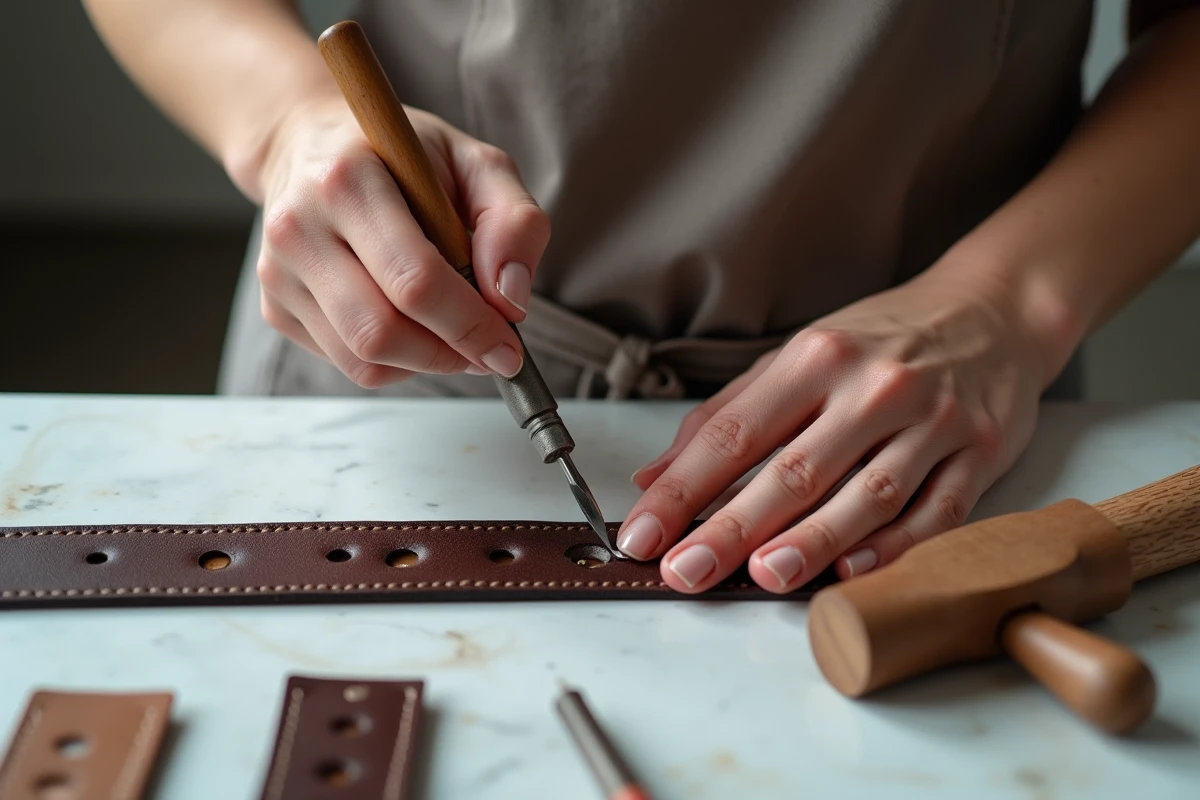
- The round punch is suitable for isolated holes in fine to medium leather. It is struck with a mallet and offers good control over positioning. Its drawback: it quickly tires the hand over a series of perforations.
- The hole cutter cuts a disc of leather instead of pushing it out, resulting in a cleaner edge. Combined with a bench press, it ensures a consistent diameter across a series of holes.
- The rotary pliers work well for belts and thin straps. It offers several diameters on a rotating barrel. However, it lacks power on leather thicker than three millimeters.
The choice also depends on frequency. For a one-time project, a punch is sufficient. For regular leather goods, investing in a press with a set of hole cutters improves precision and work comfort.
Sewing holes or rivet holes
A sewing hole must be just wide enough to allow the needle and thread to pass, without excess. If it’s too large, the thread does not fill the space and the seam lacks strength. Forked awls, which create slits rather than circles, remain the standard for saddler’s stitching.
A hole for a rivet or grommet requires a precise diameter, calibrated to the stem of the metal piece. It’s better to test on a scrap piece of leather before punching the final piece. A rivet too tight in a narrow hole distorts the leather surface around the fastening.

Placement of holes on leather: avoid fragile areas
The cutting technique is not everything. A perfectly round hole placed in the wrong spot weakens the entire piece. Placement deserves as much attention as the punching action itself.
Leather has a fiber direction, called the grain. A hole punched too close to an edge in the direction of the grain risks turning into a slit under tension. The practical rule: leave at least a distance equal to the diameter of the hole between the center of the perforation and the nearest edge.
Folding areas are also risk zones. On a wallet, for example, avoid placing a perforation on the fold line. The leather undergoes repeated bending at that spot, and the hole becomes a breaking point.
Mark before punching
A scratch compass or a metal ruler can mark the exact location. Draw on the flesh side (the back) rather than the grain side (the front), to avoid leaving visible marks. Use a fine point, not a pen, which could stain the leather.
Always align your markers before taking the punching tool. On a series of holes for lacing or sewing, a placement error of just one millimeter is immediately noticeable on the finished product.
Finishing the hole and mechanical strength after punching
A raw hole, even well punched, can wear or enlarge over time. A few simple actions extend its lifespan.
- Deburr the edge of the hole with a rounded knife or a corner cutter. This removes protruding fibers and gives a smooth appearance.
- Apply a thin layer of edge glue or contact cement around the internal perimeter of the hole. The hardened edge resists mechanical wear better.
- For belt holes, a metal grommet placed after punching reinforces the perforation and prevents gradual ovaling caused by the buckle.
The strength of the hole also depends on the quality of the leather. Full-grain leather retains the shape of a perforation better than split or reconstituted leather, whose internal fibers are less cohesive.
Each hole removes material and locally reduces the strength of the piece. Planning the number and position of all perforations before starting avoids adding holes as you go. A drilling plan drawn on paper, then transferred to the leather, limits placement errors.